Spring 2012
This is a late update of the things that I did
during Spring 2012 – it’s taken me a long time to put it on here.
Oil leak
For quite a while there had been an annoying small oil leak that
was dripping oil somewhere from the front end of the engine block.
I took the car to Kevin in Droitwich for him to have a look at the
problem. He had previously seen a very small leak from the front
end of the sump but this time he discovered a leak from the front
crank seal. He had problems getting the oil pump drive gear off
the crankshaft, it had semi welded itself to the crank, and he had
to use a plasma cutter the remove it. I decided that as Kev had
the sump off then it would be a good idea to replace the oil pump
and the water pump. To remove the sump the exhaust downpipe has to
be removed but the bolts holding this to the exhaust manifold
sheared off and the manifold had to be removed to be drilled and
tapped to allow new bolts to be fitted. A new exhaust manifold
gasket was fitted and a new timing belt.
Personalised registration number
Having seen on a TOC post that there were some plates ending in
TTE available from the DVLA I now have S16 TTE for my
supercharged, 1.6 litre 16 valve Corolla with TTE front bumper and
TTE rear hatch spoiler. You see what I did there? Toyota Team
Europe (TTE) used this model of Corolla as a basis for their
Corolla WRC car.
I was hoping to get shorter registration plates made up as the
registration has 6 digits rather than 7. I should be able to get a
plate of 410mm x 111mm – 110mm shorter than standard. Finding a
place locally that makes smaller plates has proved impossible and
I’ve found only one place so far after spending hours trawling the
internet. In the end I bought standard sized plates from a local
motor factor, the registration has been transferred at the local
DVLA office, I’ve informed my insurer and the plates are on.
Bonnet closure
The bonnet had not closed correctly since before the car was
repainted, there was obviously some part of the radiator cooling
plate that's interfering with the underside of the bonnet. To get
the bonnet to close securely I had to slam it hard and sometimes
more than one attempt was required. I decided to do something
about it but needed to know where the interference was occurring.
I bought some A4 sized carbon paper and taped three sheets of it
across the full width of the plate then shut the bonnet. When I
opening it and removed the carbon paper I could see where the
carbon had been left on the plate and the bonnet. It showed that
the middle part of the bonnet was hitting the leading edge of the
top part of the plate but only in the middle for a length of about
300mm.
There was a projection of the underside of the bonnet in this
area. I decided to try to reduce the thickness of the plate and
used my orbital sander loaded with 80 grit sandpaper. After
removing as much aluminium as I thought necessary I trial fitted
the plate again with carbon paper and it shut easily, after I
pushed the loom clips back into the slam panel so they were no
longer protruding. Removing the metal left lots of sanding marks
on the plate so I changed to 100 grit. Then 180 grit and finally
240 grit wrapped around a hand sanding block. As well as the edge
I sanded down the rest of the top surface of the plate and Alun
has repainted it when I took the Corolla back to him to repair the
scratches I’d accidentally made on the hatch and rear bumper by
dropping my keys. Now the bonnet closes easily.
Changing the park position of my E11 rear
wiper
For some reason Toyota set up the rear wiper on my UK pre facelift
E11 3 door hatchback to park at an angle of about 10* to the left
of vertical. On most other cars you see the wiper parks
horizontally at the bottom of the rear screen. For a long time I
have been meaning to alter the park position of the rear wiper.
Bart, a member of the Corolla.nl forum, had documented the
procedure for doing this. The instructions were not that easy to
understand as English is not his first language but thanks to the
photographs I was able to follow the procedure. I used a 10mm
socket (a spanner will work just as well), a large Philips
screwdriver, a bench vice, a pair of vinyl gloves and a white
correction pen. The last two are optional.
This is what I did:-
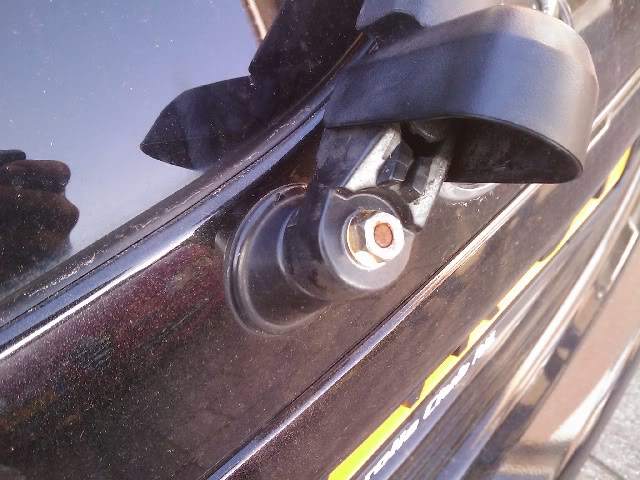
- Remove the rear wiper arm, it’s held
on with a 10mm nut which might be rusty and difficult to
remove.
- Mark the end of the wiper spindle. I
used a wire brush to clean the end of the spindle then marked
a diagonal line on it with a white correction pen. Turn on the
wiper and watch the diagonal mark to determine the direction
it moves and it’s park position.
- Remove the rear hatch interior trim
panel taking care not to mark the panel or the paint on the
hatch
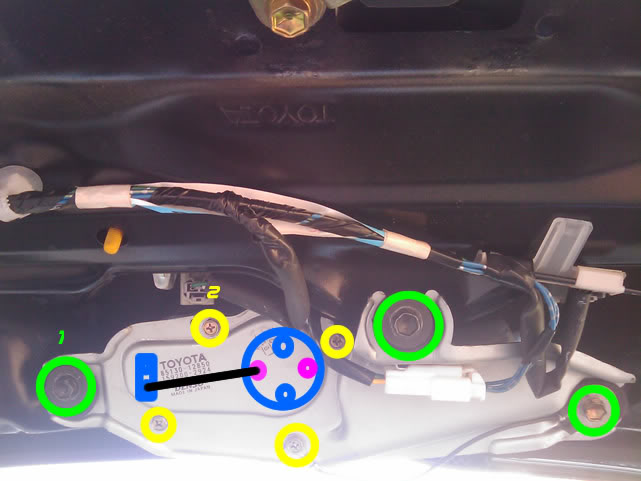
- Disconnect the electrical connector to
the wiper motor
- Undo the three 10mm bolts holding the
wiper motor and remove the motor from the hatch.
- Remove the four Philips screws holding
the cover on the drive train. Inside you find a lot of yellow
grease so I suggest wearing vinyl or latex gloves until the
cover is replaced.
- Remove the arm connecting the large
cog to the wiper spindle.
- Remove the large cog
- Now you need to move the pin in the
large cog and put in back into the cog in a position
diagonally opposite it’s original position. I did this by
holding the pin in the jaws of a vice and gently levering the
cog off the pin. Push the pin back into the correct hole.
- Place cog back into motor casing and
replace the connecting arm on pin and wiper spindle.
- Replace drive train cover (don’t
forget the earth wire).
- Bolt the motor back onto the hatch
(don’t forget the earth wire).
- Reconnect the electrical connection.
- Turn on the wiper and watch the
diagonal line on the end of the spindle to ensure the movement
is in the correct direction. Turn off the wiper and allow it
to park itself.
- Refit the wiper arm making sure that
the blade is in the correct horizontal park position. You can
test it again so that you can see the results of your
handiwork
- Refit the interior trim panel.
The whole process took me about 40 minutes.
The pictures below were not taken by me and are not of my
Corolla. They come from a guy called Bart who posted them on
a Corolla site in the Netherlands.
Other stuff
I have done a couple of other things.
I ordered a new exhaust gas temperature sensor from SPA, the same
part number that I used the last time I bought a replacement. When
it arrived it was a different unit to the existing one. This one
was shorter and thicker so less likely to suffer accidental damage
but slower to respond to temperature changes from what I’ve read.
The thread is the same so I removed the old one, screwed the new
one into the exhaust manifold and connected it up. When I fired up
the engine the exhaust gas temperature gauge responded slowly but
as the temperature increased it responded faster.
I’ve replaced the spark plug cover which had some blistered paint
on it. I had considered repainting it but when I’ve done that in
the past it’s always blistered so I decided to buy a new cover
from Toyota. I’ve also fitted some new clips to the rubber seal at
the top of the bulkhead at the back of the engine bay and some
clips to the seal at the front on the underside of the front of
the bonnet. The exhaust manifold heat shield gets very messy quite
quickly and I’ve bought a new one to put on when we get to car
shows.
The battery (new last November) is not holding a charge for more
than about 2 weeks. I’ve checked the charging voltage – it is 14.4
volts no matter the revs or the electrical load and after a 45
mile drive the battery case is still cold so it does not appear to
be overcharged.
Kev has changed the battery and I haven’t had any problem yet.
Just in case I do get a problem I have invested in a new C-tek
battery charger and a comfort panel adaptor. This has been fixed
to the battery box and allows connection of the charger to the
battery without removing the box lid. It also has three lights
showing the battery charge state – very convenient.
I have a new gearstick gaiter – the simulated leather one from the
Corolla G6R with red stitching.
Last time I washed the Corolla I found that the radio aerial was
not straight. I checked that it was screwed in correctly and not
cross threaded. It wasn’t so I checked the antenna itself and it
was bent just above the threaded end. I tried to straighten it but
it fell apart in my hand. I’ve had to get a new aerial.
Driving the car back from Tatton Park car show I found that there
were squealing / scrapping noises every time I pushed the brake
pedal. My first thought was a stone between the pad and disk so I
removed each wheel in turn, removed the pads checking for anything
that might be causing the noises but found nothing until I had
removed the 4th wheel. When I removed the pads from the carrier
the spring steel shim from the top of the pads fell out of the
carrier. The outside one was bent out of shape and when replaced
was rubbing the disk, that’s what the problem was. As these shims
are all different I ordered new ones for the all the front pads
with the help of a diagram from Toyota Newport I’ve replaced them
all correctly.